공공데이터를 이용한 앱을 만드는 작업을 하였다.


Json 으로 데이터를 요청하였는데, key 값이 한글이었다. 


[ {지역 : "경기도", 연락처 : "xxx-xxx-0000" } , {지역 : "서울", 연락처 : "xxx-xxx-0001" } ]


미리 만들어 둔 VO 에 넣어서 처리하려던 나의 계획은 물건너 갔지만, ObjectMapper를


이용하여, HashMap 리스트로 만들어서 처리하기로 하였다.


public void testJackson() throws IOException {        
    JsonFactory factory = new JsonFactory(); 
    ObjectMapper mapper = new ObjectMapper(factory); 
    String from = "Json 데이터";
    TypeReference<List<HashMap<String,Object>>> typeRef = new TypeReference<List<HashMap<String,Object>>>(){};
    List<HashMap<String,Object>> o = mapper.readValue(from, typeRef); 
}   


블로그 이미지

kyungseop

공부한 내용 정리

,

목차

  1. Slack 에서 연동 설정

  2. Redmine 에서 연동 설정


Redmine & Slack 연동 플러그인


레드마인 설치 환경 

OS :  windows 2008 R2 

Redmine installer : Bitnami


Slack 에서의 작업

  • 계정에서 Configure Integrations 선택


  • Integrations > Incoming WebHooks 의 View 선택


  • 채널등록


  • Redmine Slack 플러그인에 등록한 Webhook URL 획득


Redmine 에서의 작업


  • git 을 이용하여 플러그인 다운로드

    • git clone https://github.com/sciyoshi/redmine-slack.git redmine_slack

  • 플러그인 명은 반드시 아래와 같이 해줄 것

    • redmine_slack


  • 다운로드 받은 플러그인을 레드마인 플러그인 디렉토리도 복사한다. bitnami 가 아닌 경우 plugins 디렉토리가 다를 수 있다. 

    • C:\Bitnami\redmine-2.6.0-3\apps\redmine\htdocs\plugins

  • 복사 후 경로 

    • C:\Bitnami\redmine-2.6.0-3\apps\redmine\htdocs\plugins\redmine_slack


플러그인 추가 취키를 보면 마이그레이션이 요구되는 경우에만 사용하라는 명령어가 

보인다. slack 플러그인에서는 언급이 없었지만 반드시 해주어야 하는 작업임.

  • rake redmine:plugins:migrate RAILS_ENV=production


위와 같이만 하면 에러가 나며  bundle exec 를 앞에 붙여서 실행 한다. 

  • bundle exec rake redmine:plugins:migrate RAILS_ENV=production


그랬더니 아래와 같은 에러발생 

  • cannot load such file httpclent


 httpclient를 slack 플러그인에서 사용하기 때문에 추가해 주어야 한다. 


  • 추가 방법

  1. bundle install

  2. bundle exec rake redmine:plugins:migrate RAILS_ENV=production


하지만 cannot load such file httpclent 에러가 여전히 발생  (관련 이슈 : https://github.com/sciyoshi/redmine-slack/issues/46)


아래와 같이 실행하면 ruby 관련 프로그램들을 업데이트 해준다. bundle exec rake redmine:plugins:migrate RAILS_ENV=production 실행

  • bundle install --no-deployment


실행 결과 : 


Fetching gem metadata from https://rubygems.org/.........
Resolving dependencies...

(something updating).............

..............

DL is deprecated, please use Fiddle
(in C:/Bitnami/redmine-2.6.0-3/apps/redmine/htdocs)
Migrating redmine_slack (Redmine Slack)...


레드마인을 재시작 하여 플러그인 추가 확인


플러그인 > 설정 > Slack URL 란에  Webhook URL 복사


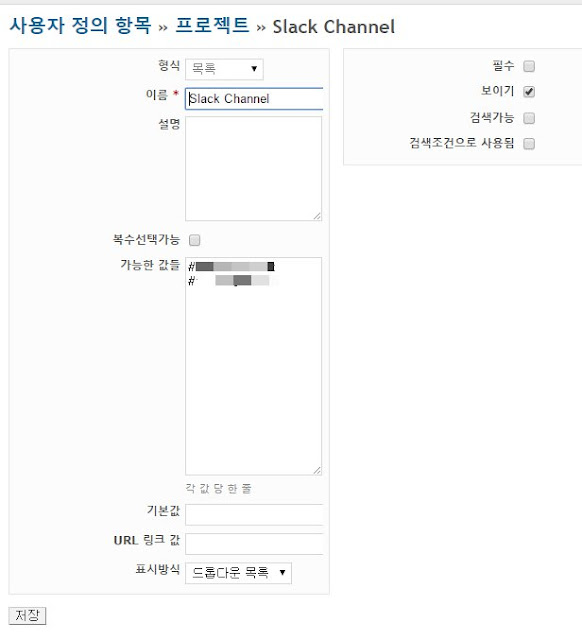
관리 > 사용자 정의 항목 >  새 사용자 정의 항목 선택 


가능한 값들에는 #슬랙채널 형식으로 기록하면 된다. 


슬랙과 연동할 프로젝트로 가서 설정을 클릭하면 Slack Channel 메뉴가 생겨있다. 원하는 채널을 정해준다.


일감 생성 후 화면 


블로그 이미지

kyungseop

공부한 내용 정리

,


커널버전 및 OS 버전 확인


uname -r

cat /proc/version


OS 패키지 업데이트 


yum update


리눅스 커널 다운로드


다운로드 후 복사 또는 wget 사용 


압축파일은 /var 폴더에 옮겨 놓을 것


압축해제


cd /var

tar xvf linux-4.8.14.tar.xz


심볼릭 링크


cd /usr/src/

ln -s /var/linux-4.8.14 linux


컴파일


cd /usr/src/linux

make mrproper

make clean (커널 컴파일에 필요하지 않은 소스파일 정리)


현재 리눅스의 커널 설정파일을 이용해 4.8.14버전의 컴파일할 소스파일 복사

cp /boot/config-‘uname -r’ ./.config

(`uname -r`은 키보드에 숫자 1번 옆에 있는 특수문자)


신규 커널 정보 설정을 위한 툴 실행

make menuconfig


만약에 기존 커널 설정 정보를 그대로 가져가고 싶다면 아래 명령어만 실행하고 커널 컴파일 단계로 넘어간다.


make oldconfig


menuconfig 화면 


  • 주의: 체크는 "스페이스바"를 사용하고 적용은 "엔터"를 사용한다. 스페이스바를 잘 못 눌러서 변경하지 않아도 될 것을 수정하는 일이 없도록 할 것


General setup 설정 


Enable deprecated sysfs features to support old userspace tools (NEW) 선택 


해당 설정을 저장하기 위해 <Save>로 저장 하고 (100%) 가 된 것을 확인 후 Exit


커널 컴파일 


make all (20~40분 가량 소요)


커널 설치 ( /boot 에 파일 생성 및 신규 커널 정보를 grub.conf file 파일에 추가)


make modules_install

make install


커널 적용을 위한 default 부팅 값 수정


vi /boot/grub/grub.conf


4.8.14 버전이 첫번째 라인에 있으므로 0번이기때문에 default=0 으로 설정


리눅스 재시작 후 커널 버전 확인


reboot

uname -r


신규 커널로 부팅이 되지 않을 경우 이전 커널로 재부팅 하는 방법 


리눅스 재시작 후 영문자 E 버튼을 눌러 문제가 없던 이전 커널로 부팅 후

문제가 되는 부분 수정하여 적용하면 된다. 


menuconfig 에서 실수로 gzip 관련 support를 하지 않도록 하고 컴파일 하여 kernel panic 발생하였음.

menuconfig 에서 gzip support 를 추가하고 다시 컴파일하여 해결하였음


참고: 


커널업데이트

https://howtos4linux.wordpress.com/tag/how-to-install-latest-linux-kernel/

블로그 이미지

kyungseop

공부한 내용 정리

,

Snapshot 저정될 경로 설정 (elasticsearch.yml  path.repo)

#

# ----------------------------------- Paths ------------------------------------

#

# Path to directory where to store the data (separate multiple locations by comma):

#

#path.data: /path/to/data

#

# Path to log files:

#

#path.logs: /path/to/logs

path.repo: ["C:\\Users\\kyungseop\\workspace\\elasticsearch\\elasticsearch-5.5.1/\\backups\\my_backup"]


Snapshot 설정 추가

PUT /_snapshot/my_backup

    "type": "fs",

    "settings": {

      "compress": true,

      "location": "C:\\Users\\kyungseop\\workspace\\elasticsearch\\elasticsearch-5.5.1\\backups\\my_backup"


Snapshot 설정 조회

GET /_snapshot


조회 결과 

{

   "my_backup": {

      "type": "fs",

      "settings": {

         "compress": "true",

         "location": "C:\\Users\\kyungseop\\workspace\\elasticsearch\\elasticsearch-5.5.1\\backups\\my_backup"

      }

   }

}


Snapshot 생성

PUT /_snapshot/my_backup/snapshot_1?wait_for_completion=true


생성결과 

{

   "snapshot": {

      "snapshot": "snapshot_1",

      "uuid": "e14pNC8WTPekPsQQZxdFJw",

      "version_id": 5050199,

      "version": "5.5.1",

      "indices": [

         "account"

      ],

      "state": "SUCCESS",

      "start_time": "2017-08-17T07:06:59.164Z",

      "start_time_in_millis": 1502953619164,

      "end_time": "2017-08-17T07:06:59.460Z",

      "end_time_in_millis": 1502953619460,

      "duration_in_millis": 296,

      "failures": [],

      "shards": {

         "total": 5,

         "failed": 0,

         "successful": 5

      }

   }

}


Snapshot 결과 조회

GET /_snapshot/my_backup/_all


조회 결과 

{

   "snapshots": [

      {

         "snapshot": "snapshot_1",

         "uuid": "e14pNC8WTPekPsQQZxdFJw",

         "version_id": 5050199,

         "version": "5.5.1",

         "indices": [

            "account"

         ],

         "state": "SUCCESS",

         "start_time": "2017-08-17T07:06:59.164Z",

         "start_time_in_millis": 1502953619164,

         "end_time": "2017-08-17T07:06:59.460Z",

         "end_time_in_millis": 1502953619460,

         "duration_in_millis": 296,

         "failures": [],

         "shards": {

            "total": 5,

            "failed": 0,

            "successful": 5

         }

      }

   ]

}


Snapshot Restore

POST /_snapshot/my_backup/snapshot_1/_restore


Snapshot Restore  발생가능 에러 (index  사용중일때)

{

   "error": {

      "root_cause": [

         {

            "type": "snapshot_restore_exception",

            "reason": "[my_backup:snapshot_1/e14pNC8WTPekPsQQZxdFJw] cannot restore index [account] because it's open"

         }

      ],

      "type": "snapshot_restore_exception",

      "reason": "[my_backup:snapshot_1/e14pNC8WTPekPsQQZxdFJw] cannot restore index [account] because it's open"

   },

   "status": 500

}


Snapshot Restore (index close  restore)

POST /my_index/_close


elasticsearch.yml  path.repo 설정을 하지 않고 Snapshot 지정시 에러

{

   "error": {

      "root_cause": [

         {

            "type": "repository_exception",

            "reason": "[my_backup] location [C:\\Users\\kyungseop\\workspace\\elasticsearch\\elasticsearch-5.5.1\\backups\\my_backup] doesn't match any of the locations specified by path.repo because this setting is empty"

         }

      ],

      "type": "repository_exception",

      "reason": "[my_backup] failed to create repository",

      "caused_by": {

         "type": "repository_exception",

         "reason": "[my_backup] location [C:\\Users\\kyungseop\\workspace\\elasticsearch\\elasticsearch-5.5.1\\backups\\my_backup] doesn't match any of the locations specified by path.repo because this setting is empty"

      }

   },

   "status": 500

}


참고

  • https://www.elastic.co/guide/en/elasticsearch/reference/current/modules-snapshots.html


블로그 이미지

kyungseop

공부한 내용 정리

,